Showing posts with label Winter. Show all posts

March 15, 2011

Middle Of March

It’s the middle of March and the snow drops are just starting to pop open here on Cape Cod.  Spring is just around the corner!

After enduring a long cold winter, mice, mites, small hive beetles, starvation, falling trees, and poor food stores, the bees are just now beginning to emerge from their winter cluster.


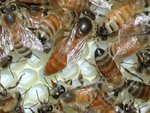
:Left:  Small Hive Beetle, dead on the sticky board.

          In March?  Realy?


The queen should have started raising young by now, and the new bees will be taking fights for the first time. How many of them emerge fly a little too far from the hive and become too chilled to make it back home?


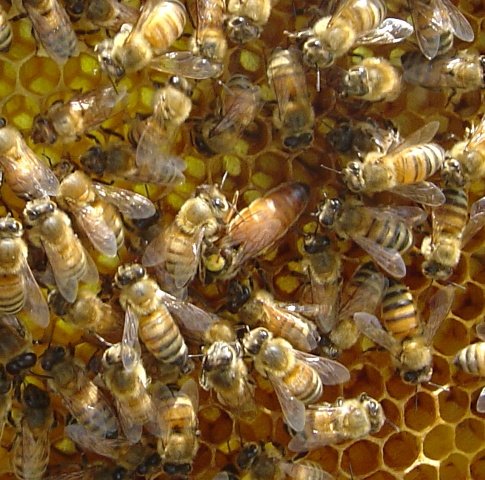
Right:  Bees were finally able to take flight during warmer days here and there over the past couple of weeks.


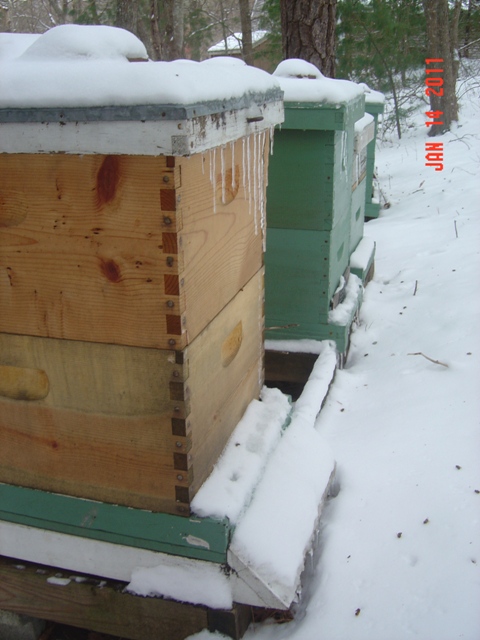
We lost 50 percent of our hives to this long winter. We did not receive our January thaw as we do most years. Temperatures remained in the 30's for six weeks or more.  But then, I don't have to tell most of you that!

Of the remaining hives two are very weak. The Kona queens I introduced last year seam to be longing to return to the warm Hawaiian weather they came from.

They did not do well here.

Of course they have done better than the dead hives… That’s it… Look on the bright side!


Left:  My storage shed.... Filled with beekeeping equipment, boxes, frames.....  And mice!


One hive that started the winter with plenty of bees, frames of pollen, and frames full of honey was found dead a couple of weeks ago.

I had given them candy feed towards the end of January.

At that time they were robust…. 7 frames of bees. When I dissected the dead hive I found thousands of dead bees only two inches away from capped honey. There were still 6 frames of capped honey in the hive and three frames full of pollen. Why did they die? During the cold weather they probably just could not shift over to the food stores. What a shame!


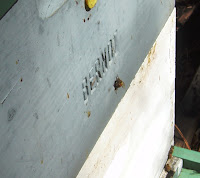
Right:  The mice are so bold as to build nests in plain sight!


Sometimes you cannot figure out what went wrong. Is it natural selection? Or just a stupid beekeeper?

But yes…. As beekeepers often do, I spend a lot of my time during the winter thinking and dreaming about the bees. Perhaps answers come during those long months. I do have something up my sleeve… Perhaps I can do something about the weather!

The mice have been taunting me all winter as well. Despite my best attempts at thwarting them I continue to find chewed items around the storage shed. They love the newspaper wrapped wax foundation. An expensive item to snack on.


Right:  Outside temperature 34 degrees....  Inside temperature 60.

Perhaps I've found a way to control the weather!


One family even had the nerve to build a home right in plain sight, as if to dare me to try to do something about it!

But bright days are ahead! The weather is warming. The days are getting longer. The first flowers are poking there sleepy heads above the ground. The bees are starting to fly…

Yes the bees are starting to fly!

January 26, 2011

Bees And Snow

It is the middle of winter here on Cape Cod. In fact we are getting another snow storm as I write this blog post.


Left:  Icickles hanging from the cover of  the hives.


Already the cold winter has claimed the life of one of our hives. It seems that they starved only inches away from stores of honey and pollen. The weather must have turned cold for too long of a time. The cluster of bees could not move to a new location.

I cleaned out the dead bees and placed the hive bodies in storage. There are 8 frames of honey left in the dead hive along with frames full of pollen. A new package of bees in the spring will take advantage of the hard work done by the deceased hive.

Right:  Bees were flying and still gathering pollen in the middle of November.  They needed all the food they could gather after the bad summer season we had last year.


As I mentioned earlier we are experiencing an unusually snowy and icy winter this year. The snow from one storm turns to ice just before another one hits. Of course we have been fortunate compared to other towns further inland where they have received much more snow. Our deepest accumulation has only been 6 inches or so, compared with feet of snow inland.

The bees have been consuming much bee candy this winter due to the colder temperatures. It was nice to see them flying in December, on the two days temperatures climbed into the 40’s.

I have one nuc hive I am trying to over winter in one hive body that seems to be struggling. It contains one of the queens I raised last summer. I’m keeping my fingers crossed that they will make it.


Left:  A cluster of bees feeding on bee candy places on the tops of the frames of comb.  This candy will last them about one month.


This time of year I start to get a little stir crazy. I find myself sitting and dreaming about the bees and spring. There is not much beekeeping activities to do other than wait for the new catalogs and the bee journals to come in the mail. Well...  a glass of mead while reading a bee journal isn't all that bad..

What new products will we find and be trying out this season?

There it is again…. As the snow falls….. I’m dreaming of summer!

February 15, 2010

Winter Beekeeping - Make Some Mead

What else to do… What else to do…

I "must" find something to pass away the winter days without the bees……

MEAD…
.
.
.
.
Right: Lemon and orange zest and juice along with 12 pounds of honey.
.
.
.
.
.
.
.
.
.
.

Honey was for thousands of years the main sweetening agent known to humans.


Life, Courage, Wisdom, and strength were believed to be provided by honey. The Bible, Hinduism, Aristotle, Virgil, Celtics all echo the praises of honey.
.
.

Left: Zest and spices ready to be boiled in the "must"

.

.

.

.


.

There are many types of mead. Dry, Sweet, Wine like, Beer like, mixed with fruit (Melomel), mixed with herbs (Pyment, Hippocras, Metheglin, Cyser).


.


Right: Pure water and spices boiling to create the "must". Once cooled the honey and yeast will be added and fermentation will begin!

.


In its simplest form, honey is mixed with water and fermented. The amount of honey mixed in proportion to the water controls the amount of alcohol that can be produced in the final drink. It also controls how sweet the drink will be. In this simple form the flavor of the mead will be created by two things… the flavor of the honey used, and any flavors added by the particular strain of yeast used to ferment the must (mixture).

.

Left. The empty fermentation bucket after two weeks of fermentation. You can see how mudy the must looks from the yeast.


Meads will taste different if different types of honey are used. A wild flower honey will impart a different flavor to the mead than say a cranberry or orange blossom honey. A champagne yeast will have a different flavor than a merlot yeast.

There are hundreds if not thousands of recipes for mead. Choosing one is difficult.

Back in 1978 I made my first batch of mead. It was just a simple honey, water, yeast mixture. It fermented, bottled, and aged. At just the right moment a bottle was opened and tasted.

Reminded me of kerosene!...... Others liked it.

This year I created my own recipe, actually a combination of two that seamed interesting. I would be using honey from our hives of course. Cape Cod Wild Flower Honey to be exact. I wanted a spiced fruity mead. More of a Metheglin I would say.

I started with orange and lemon zest, and juice, a touch of chamomile, cinnamon, ginger, cloves, yeast nutrient, and tannin in a muslin bag. Boiled in water for 15 minutes, and then rested the must for 15 minute. The must was added to a sterilized fermentation bucket along with 12 pounds of honey. Once the must was cool the specific gravity of the must was taken and champagne yeast was added and fermentation started within hours.

.

.

Right: The "must" is "racked" into a secondary fermentation container fitted with an air lock. The air lock protects the mead from wild yeasts or other thinks that could ruin the mead.

.

.

.

.

.

Why check the specific gravity you ask?

By taking a specific gravity reading prior to fermentation, and comparing it to a reading after fermentation is complete allows us to calculate how much alcohol was produced in the mead. An alcohol content between 12% and 13% will preserve the mead and keep it from turning bad. The bees would not be happy if all that honey went to waste now would they!

The alcohol, being produced, is a byproduct of the fermentation process. Yeast is a living organism that consumes sugar and nutrients from the must, and produces alcohol and carbon dioxide as waste. The carbon dioxide comes out of the must as bubbles (gas).

Its fun to watch the mead bubble away. Especially knowing that for every tiny bubble of carbon dioxide, an equal amount of alcohol is produced.

Eventually the yeast runs out of sugar (food) to eat, and the fermentation process is complete.

Now we will have to wait for the mead to “clear” which means all the yeast settles to the bottom of the container and a clear drinkable liquid can be bottled. Mead takes a couple of months to clear.

.

Left: You can see the bubbles created by the yeast. Toasted oak chips have been added to give the mead an oak cask flavor.

.

.

.

.

.

.

.

Once bottled, the mead will have to age for a year or so before it will taste good enough to drink.

I don’t think I will be able to wait that long though!

Good Mead web pages:

The Joy Of Mead:

http://www.stormthecastle.com/mead/index.htm

Eckraus:

http://www.eckraus.com/wine-making-mead-honey.html

The wine making home page:

http://winemaking.jackkeller.net/reques28.asp

January 27, 2010

Minding your own beeswax

Winter Beekeeping
Minding your own beeswax

It is the end of January, about the most boring time of the year for a beekeeper. There are no bees flying around the hives, no spring flowers, and it is too early to order more bees.

The new beekeeping catalogs have not even arrived in the mail yet!


Right: Uncapping the Honeycomb. The hot electric knife melts the comb and sizzles as it slices its way through the wax.


Suddenly you remember that bucket full of wax cappings, from the fall honey extraction, sitting in your basement AHHH a bee project at last!

Beeswax was being used by people more than 5,000 years ago. The ancient Egyptians used wax for embalming and making waxen figures.

The Romans used wax tablets to write private messages on. The message, once read, could easily be smoothed out and erased by running your fingers over the message etched into the soft wax.

In the fourteenth century having beeswax candles was a sign of nobility. Beeswax candles burned more cleanly, burned longer, and smelled much better than the cheaper candles made from mutton fat.

That is actually one of the things that hooked me on beekeeping when I was in my teens. No not nutten fat…. It was that sweet, sweet smell of beeswax. There is only one thing better….. That’s the sweet smell of melted beeswax and hot honey on extracting day.


Left: Frames of honey comb sits in the uncapping tank. Wax cappings can be seen at the bottom of the tank. The screen at the bottom of the tank allows honey to drain off the cappings and into a holding tank.


I use the beeswax produced by our bees for candles, lip balm, and hand cream. But before the beeswax can be used for these items it must be cleaned. How do you clean beeswax…. Well I tell you my secrets.

You may not know that beeswax is produced by glands located on the underside of the worker bees. These glands become active when the young bees reach a certain age. It takes a lot of energy (food) to produce wax, and some colonies are much better at producing it and building comb than others. The wax that the bees produce is the construction material of the hive. Wax is molded by the bees to create the comb that is used to raise young bees and store the pollen and honey they use as food during the winter months. It is interesting to note that although wax production and comb building is the work of younger bees, If by chance something were to kill off all the younger bees, the older bees would suddenly become able to produce wax again.

So how do we get the wax from the bees?......

We take it of course.


Right: Melting the wax cappings in an old pot containing water.


Bees are avid builders. They will build comb everywhere. Where you want it, and many times where you don’t. The hives we use are designed to encourage the bees to building comb were the beekeeper wants it..... In the frames of the hive.

We start with a sheet of wax in the frames as a starting point for the bees. The bees will then produce wax and build out the frame by building the comb. Bees will also produce comb between boxes and on top of frames. This wax is removed from the hive during inspections. Some of the wax we use is collected in this manner.

Some of the comb is used by the bees to store honey, hopefully a lot of honey, although some years not enough. When the honey is "ripe" the bees will “cap” it with a layer of very white wax. This layer of wax protects the honey from absorbing moisture from the air, and thus preserves the honey until it is needed by the bees.

In a good year the bees will produce an abundance of this honeycomb allowing the beekeeper to “steal” some of it for his own personal use. We can’t take all of it, even though we want to, because the bees need to keep about 50 pounds for themselves in order to survive a typical New England winter.

In a good year the bees will produce about 60 pounds of surplus honey per hive. I have had hives produce up to 90 to 100 pounds of surplus honey.


Left: Dibris left on the cheese cloth after the melted wax and water is poured into the disposable container.


The frames of honeycomb are removed from the hive and taken to the extracting room to have the honey removed. This process includes using a hot electric knife to cut off the white cappings exposing the liquid honey. The frame can then be put into an extractor (basically a large centrifuge) and the honey is spun out of the frames.

At the end of the process you end up with frames containing empty comb, liquid honey, and the beeswax cappings. The empty comb will be placed back in the hives the following season allowing the bees to just refill them without having to rebuild them.


Right: Clean wax floats to the surface while the water and dibris settles to the bottom of the container. This process must be completed three times to clean the wax enough for use.


The wax cappings along with all the burr comb can then be processed into usable wax. There are probably many ways to clean and render the wax. This is just my method.

Remember that wax is flammable and care must be taken when heating it!

I use an electric heating element to melt our wax. I always mix water with my wax when melting it down. This insures that it will not over heat and burst into flames. The water also helps “clean” the wax. Once melted I pour the wax and water through two layers of cheese cloth into a disposable container. The wax and water is allowed to cool. Once cool the container can be cut open releasing the dirty water and the solid wax. The wax will have many impurities left in it, and this process is repeated two additional times before it is clean enough to use.


Left: The reward for all the hard work. Sweet smelling clean bees wax ready for use in candles and balms.


It is a lot of work!

But the sweet yellow beeswax reward is well worth it!

Spring

Spring
Peach Pollen

Spring Pollen

Spring Pollen

Queen Cell

Queen Cell
Well Fed Queen Cell

Marked Queen

Marked Queen
Queen produced from my second graft attempt