Showing posts with label Queen Rearing. Show all posts

May 30, 2011

May Bee

The long holiday weekend finds me posting my first blog post for the month of May.


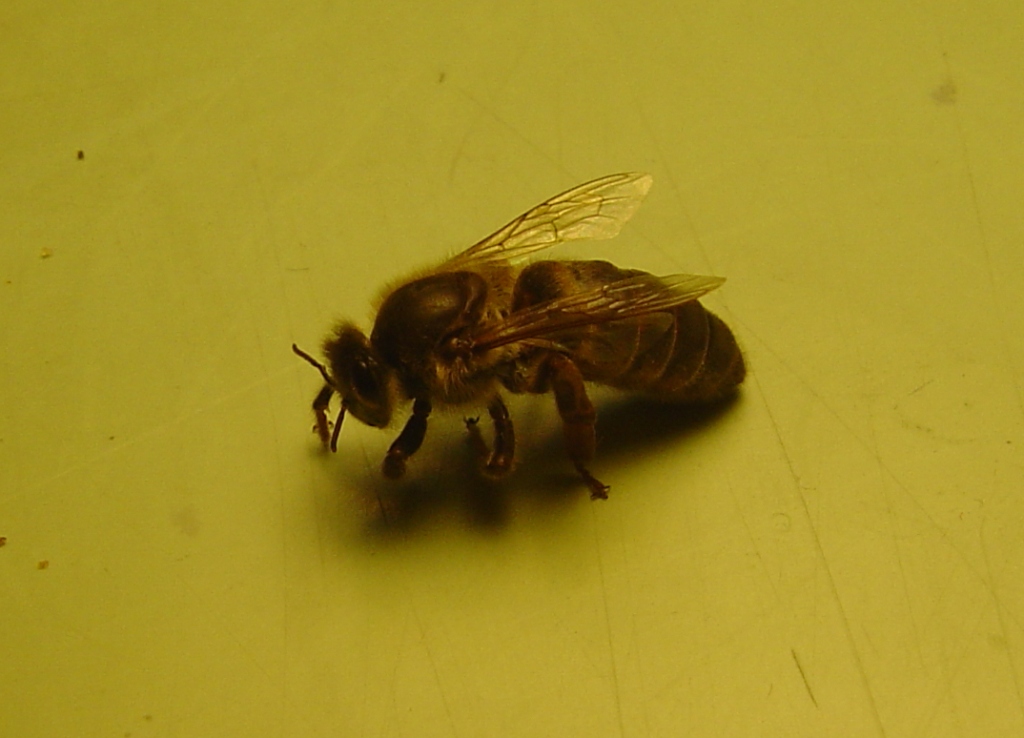
Left:  A worker bee collecting pollen and nectar from our peach tree.


For some reason we have experienced a 90% loss of our over wintered hives this season.

Two hive have died in the month of April alone. Not usual once they make it through March

The longer than average, and cooler, spring has not helped us much. We experienced cool rainy wet weather for almost two weeks in the middle of May, not conducive for brood rearing by already weakened hives.

Last week however, the cold wet weather broke, and we are now experiencing warmer days. That means happy days for the bees who are now able to fly and collect the much needed nectar and pollen for the spring buildup.

Today I started rearing a small number of queens.


Right.  Newly grafted plastic cell cups.  These cells were wet grafted using royal jelly saved from queenrearing in 2010.


It takes 16 days for a queen to grow under the proper conditions. I took newly hatched eggs from three of my hives and wet grafted them into artificial cell cups. Wet grafting is the process of placing a small drop of royal jelly in the bottom of each artificial cell cup, and floating a young larva onto it. (a 50 / 50 mix of plain yogurt and water will do as well for a priming medium)

Eggs from the different hives were grafted into different color cell cups. Red, yellow, and black cups were used. This will allow me to tell which hive the larva was grafted from later on.

The cells were placed into a cell bar and installed in a cell starter hive.

I create my cell starter hives by taking a 5 frame nuc box with a division board feeder half full of sugar syrup, add a frame of nectar and a frame of pollen.

I have modified the nuc box so it has a screened bottom. The entrance is closed so the bees will not be able to leave.

Before I graft the artificial cells, I shake nurse bees (from frames of open brood) into the 5 frame nuc box. I use at least three frames of nurse bees, and two frames of bees from adjoining frames. Of course before I do all this I find the queen, in the contributing hive, and make sure she is not shaken into the cell starter hive!

I took my grafted cell bar frame and installed it in between the pollen and nectar frames.

The trapped nurse bees will have nothing to do but feed the young larva. Because the cell starter is queenless they will build queen cells out of the young larva.

I will wait 24 hours and check to see how many of the grafts were accepted.

Our package bees were delayed from the supplier down south. Many orders were canceled. They must have been having a difficult time there as well.

Last week we finally received our new bees. They had a long trip from Florida, traveling by night, the truck would stop for the day to allow the bees to fly. It took several days to make the trip, and the trailer of bees arrived late one night. About 20 volunteers enjoyed unloading them off the trailer.

We must have been quite the site to the neighbors….. a mass of beekeepers with flashlights (and head lamps) scurrying round a dirt road, walking to and forth, unloading over 200 packages of bees. I know I received at least one strange look from passer buy on the main road. What are you doing walking at the side of the road in a full bee suite? They must have said!

That being said I brought my bees home and installed them the next morning. They were not happy to see me….. I guess they were grumpy from they’re long trip. Several met me with the message I should leave them alone. But…. Then… You have to show them who’s boss! (bees don’t listen well)
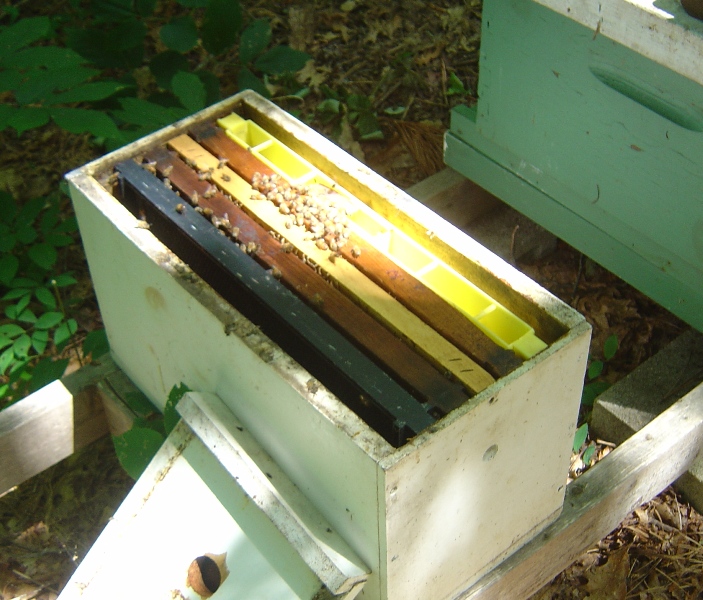

Left:  A cell starter colony mad up of a division board feeder, a frame of pollen, grafted cells, a frame of open nectar, an undrawn frame, and nurse bees.


The first nucleus of bees was installed without event. Five full frames of bees, honey, and brood were installed on previously drawn out comb. They were very active, fliying the next day in the warm sun.

I noticed that the second nucleus of bees had a recently emerged queen cell, capped brood, but no eggs or larva…. I did see a queen though.


Right:  A well feed queen larva.  The nurse bees have added royal jelly to the cell.  The larva floats on the royal jelly and eats it as it grows.  It will take 16 days for the queen to grow from an egg to a fully developed virgin queen.


She must have emerged during the long trip from Florida… But had she mated? Or was she still a virgin, unable to lay worker eggs? I would have to wait to see.

Two days later I checked the hive…. No eggs or brood…. But the queen was still there. Perhaps I would have to replace her with a laying queen…. If one could be found this time of year…..

Two days after that I checked the hive again…. Yes, there were new eggs laid in many cells. I guess this queen might just be fine. Perhaps she had mated during the trip north, while the truck was stopped in another state, and had managed to find her way back to the truck before it continued on.

Perhaps she has a little Pennsylvania or Georgia influence in her now! If you know what I mean!

Maybe she will be just fine…..


Maybee

August 3, 2010

Hot and humid days

It has been over a month since my last post.

During the last week of June I placed 13 queen cells into queen-less nuc hives. These queens, once emerged, would mate naturally and start to lay eggs in about 14 days and build new colonies.

Above:  Four mating nucs ready for queen cell introduction.
The jars will be filled with sugar syrup to feed the nucs.

Unfortunately this year’s early spring lead to early hot and humid weather.

The main honey flow stopped a month early, and because we were feeding sugar syrup to the nuc colonies, robbing ensued. Many of the mating nucs and new queens were destroyed by strong colonies that came and killed bees while robbed them of their honey and syrup.

Only 3 mated queens survived.


Left:  Virgin queens in queen cages.  These queens are being taken care of by nurse bees.  They have been placed in a queenbank colony.


As part of an experiment I had taken eight of the queen cells and arranged them so the virgin queens would emerge into queen cages. These cages were placed into a queen-less, brood-less hive. The queens emerged into the cages and were taken care of by the surrounding nurse bees. Because the virgin queens would be in the cages, they would not be able to mate.


Right:  A closer view of the banked queens.  A special frame with wire guides hold the cages in place.  The plastic cell cup seals the top of the cage.


I have had some success over the past two years rising queens. One of my strongest hives this year is lead by a queen I produced last summer. She is the daughter of the queen from my strongest hive the previous year. I have noticed that the most uncontrollable part of queen rearing is the mating process.

Above:  You can see the open queen cell inside the cage
as well as the queen.  Nurse bees surround the queen and
feed here through the cage openings.  I'm sure they are trying
to find a way to get her out!

You can pick the best stock to breed from, graft the youngest larva, place them into the strongest cell starter colony, then place them into the largest cell builder, move the cells at the right time into mating nucs, have the cells emerge successfully….. Only to see your beautiful large, genetically selected queens fly off to mate with…. Well, any drone that comes along!

It is all left to chance at that point.


Above Left:  A screw lid jar is used to put the queen to sleep with carbon dioxcide.  It only takes a few minutes       
                                                     
Above Right: CO2 is dispensed through water so the flow can be seen and regulated.

It is apparent that the week link, the place where you loose control, in the process is mating. So I started looking into the process of instrumental insemination of honey bees. With II the breeder can control the mating process and select the specific genetic material to mix with the genetics of the virgin queen.

Above:  Insemination device I have been working on.  CO2
is fed through a hose to keep the queen asleep.

My intent was to take the caged virgin queens and use them to learn about the instrumental insemination process.

Above:  Working out the "bugs" in the system
Need smaller hooks and glass tips.

For several months I have been learning, designing, and building the equipment I believed to be required. I read books, blogs, web pages, and watched videos.


Left:  This queen was put to sleep, placed in the instrument, manipulated, but not inseminated.  She woke up about 15 minutes later.


Needless to say my first attempts have had some successes and many failors….


Right:  Second queen was put to sleep, manipulated, and woke up.  She was not inseminated.


But I have learned a lot.

I will share more in future posts.

.

June 29, 2010

Queen Cells and Counting

In my previous post I described the steps I am taking this year with my queen rearing project.

As of my last post I had managed to get queen cells into cell builder colonies.

Above:  18 queen cells being removed from a queen-right cell builder colony. 
Some of these cells will be placed into queen-less mating nucs

Sunday afternoon I moved the queen cells from the cell builder hives into individual queen-less mating nucs. Usually I move the queen cells on day 14 (10 days after grafting, and two days before emergence on day 16) to the individual nucs.

Above:  As an experiment I kept 3 of the cells in the queen-less cell starter colony. 
As you can see I ended up with larger cells.

I moved them a day early (day 13) this year, because, last year I had 16 cells destroyed when one of the cells emerged early.

Step 7 Continued:
Ok, So at this point I had 21 cells, 18 in a queen right cell builder colony, as I described last week. On the 14th day (10 days from grafting, and two days before the queens emerge) the cells should be individually placed each into its own queen-less mating nuc.


Left:  By adding a frame of brood to the queen-less cell starter colony, I converted it into a queen-less cell builder colony that built larger cells.


Most of my mating nucs are regular deep hive bodies that I have divided into four compartments, each with its own separate entrance. Each compartment will hold two frames. Each compartment has a cover and a sugar syrup feeder.

To make up the nucs I take frames of bees and open larva from my hives and place them into the nucs. The nurse bees will stay with the brood to take care of it.


Above Left:  Cells from the queen-right cell builder.  Right: Cells from the queen-less cell starter.


\I place one frame of bees and brood, and one undrawn frame into each compartment. I then introduce a queen cell (with cell protectors) into each nuc.

You can see that it takes a lot of bees to raise queens. If you have 10 queen cells you need 10 mating nucs. If you have 50 queen cells you will need 50 mating nucs.

Above: One of the cells from the queen-less cell starter, converted to a cell bulder. 
You can see that there is still alot of royal jelly in the cell.


Step 8: Wait and allow the queens to emerge. Each queen will emerge on day 16 (10 days from grafting) into a nuc.

This nuc will become a little colony.

The bees will take care of the new virgin queen. In about a week she will take mating flights and mate with up to 35 drones (male bees). She will fly back to the hive, and if successful will start laying eggs in about another 7 days.


Above:  Cells from the queen-right cell builder
You can see there is no royal jelly in the cell.
Did the workers rob the royal jelly to feed to worker larva in the queen-right colony?
All the cells came from the same cell starter.  All the cells were over filled with royal jelly before they were placed in the cell builder colonies.  There is a difference!

This year I did not move all the cells into the queen-right cell builder. I left three cells in the queen-less cell starter colony. By adding a frame of emerging brood (no eggs or larva) to the cell starter I converted it into a cell builder colony. It was interesting to see that the queen-less cell starter colony built much larger cells than the queen-right cell builder colony.

It is obvious that the large number of nurse bees in the queen-less cell starter colony made a big difference in the quality of the cells. I expect I will get larger queens from the larger cells. In the future I plan to abandon the use of the queen-right cell builder in favor of a queen-less cell builder assembled specifically to build cells.


Right:  Red plastic cells and yellow plastic cells each contain larva grafted from different queens.  The cell color tells me which queen mother the cell is from.


Additionally I took eight of the cells and arranged them so the virgin queens will emerge into queen cages. These cages have been placed into a queen-less, brood-less hive. It is my hope that the workers will care for the emerged virgin queens.

I have plans for these eight virgins I may share with you at a later date.

Tomorrow 21 queens will be emerging. This weekend I will look in on them to see how the new queens are doing.

I’ll let you know.

June 23, 2010

Queen Season

Father’s Day. A holiday to commemorate all the hard working fathers. The perfect time of year to raise queens.

Generally, on Cape Cod, at this time of year, a colony will have built itself up to about 30,000 or 40,000 bees. Over the next month they will continue to increase in numbers to about 60,000. As the bees start to get crowded they start thinking about swarming.


Above:  Queen cup frame just pulled from my cell starter hive. 
After 36 hours the bees have started building queen cells. 
You can tell the accepted cells by the wax that has been added to the cell.
24 cells have been accepted out of 28 grafted cells

Swarming involves building queen cells. A beekeeper can use this natural tendency of the bees to raise his own queens.

It is always easier to work with the bees rather than against them.


Above:  Close up of the started cells

Here’s what I have been doing.

Step one.

Create a cell starter hive. Take a strong colony and locate the queen. Place her and the frame she is on aside. Now take all the frames that have open larva and shake the bees into a 5 frame nuc (at least 5 frames worth of nurse bees). What you are doing is shaking nurse bees into this nuc since they would be found on the frames with open larva. There can be no queen or they will reject the cells you put in the nuc later. That is why we located her and put her aside. To this nuc add one frame of pollen, one frame of nectar, and a wet sponge. The bottom of the nuc should be screened so the bees will not over heat. The entrance must be closed so the bees cannot return to their original colony. Put the cover on the nuc for now.


Above:  A well fed queen cell which is 36 hours old
You can see how the larva has grown in a day and a half!

Step Two

Choose the hive (queen mother) you plan to raise queens from. You will need her eggs! Of course you will select the strongest, best behaved, active, honey collecting colony you have to pick from. Locate the queen and put her aside. Also locate a frame of eggs and young larva (newly hatched) and brush all the bees off of it back into the colony you are taking it from. If you shake the frame you will also move the larva from the center of the cell it is in.

Step Three

Graft newly hatched larva, 3 days old, into primed plastic queen cell cups. I prime the cells with royal jelly I saved (froze) from the previous year. You will also have success if you prime the cells with a mixture of 50% plain yogurt and 50% water. Just a small drop in the center of each plastic cell will help you float the larva off the grafting tool. The larva should look like a comma. If it looks like a full C shape the larva is too old. Use the youngest larva you can find. Use a damp hand towel to cover the grafted cells so they do not dry out. Graft two bars of 14 cells each, that will be 28 cells all together.

Step Four

Place the queen cup frame into the cell starter hive you created earlier. Place the grafts between the two frames, pollen frame to one side, open nectar frame to the other. Now leave them alone for 24 to 48 hours. Place the frame of larva you took the grafts from, back into the hive you stole it from.


Above:  Same cell with wax removed.  See all the white
royal jelley in the cell?  I will harvest this and freeze it
for use next queen season


Step 5

Prepare a queen right cell builder hive. Open the hive and find the queen. Place her in the bottom hive super with all the empty and capped frames of brood. Place a queen excluder over the box with the queen and put all the open larva, pollen, and nectar in the box. Leave an open space between open larva and a frame of pollen to place your started cells. Leave this colony over night while your cells are in the cell starter hive. This will allow time for all the nurse bees in that colony to move to the upper box. It will be 3 days before any eggs the queen lays in the lower box to hatch and require nurse bees.

Step 6

After 24 to 48 hours open the cell starter hive and remove your grafts. You will be able to tell which cells have been accepted by the bees by the work they have started on the cell. Excepted cells will have wax being added to them. This year the bees started 24 cells out of 28 grafts. Not bad. Take the queen cell frame and place it into the cell builder hive you prepared the day before. This hive will feed and build the cells.


Above:  Just a side note.  I was pleased with the very
large crop of peas we produced in the garden this year.
Thanks polinators!

Step 7

Wait and count. It takes 16 days for a queen bee to be created. Remember that the larva you grafted is already 3 or 4 days old. The queens will hatch at 16 days old, only twelve days after you graft them. Before that happens you will need to move the individual cells into queen-less mating nucs, or a queen-banking hive.


More on that next time.......

June 14, 2010

Eggs In Your Honey

The weather did not allow me to start queen rearing this week, But there was a short window of opportunity to look in on the bees.


Above:  Worker bee collecting pollen in my garden

The weather was damp and humid, not the best conditions for opening up a hive.

Bees make great barometers you know. It can be a clear, warm, sunny day, (perfect weather for opening a hive), but if rain is coming in the late evening, the bees will let you know by their attitude.


Right:  As I clean out the shed of old bee packages, old comb, and old frames, my debris pile slowly grows.


If you are going to keep bees on Cape Cod you will have to get use to working with them in all types of weather. One minute it will be clear, then, in a minute the weather will change. I don’t know how many times I have started the smoker with blue sunny skies, only to have dark cloudy weather by the time I pull out my first frame of bees.


Left:  Another worker collecting nectar and pollen


Saturday, between the rain, the bees were flying, obviously collecting nectar an pollen from something that is in bloom.

Above:  A solid brood pattern layed by one of the queens I raised last season.


I opened up the hives to find that the bees were storing honey in the honey supers.

I made a choice this season to not use queen excluders when supering for honey. A queen excluder is a grid of wire that when placed between boxes of comb prohibits the queen from passing between the boxes. The spacing in the grid allows worker bees to move through, but not the queen.


Left:  An over productive queen was not able to resist the temptation to lay eggs in my honey super.  Look closely and you will see the small egg at the bottom of the cell.  Click on the photo to enlarge.


In past years I felt that the queen excluders discouraged the worker bees from moving up into the honey supers, acting as more of a honey excluder than anything else.

Of course you also take the chance that the queen will move up into the honey supers and lay eggs. Not something you want to see, that is, eggs mixed on a comb with your honey.

Right:  Opening up the hive to find ripe honey being capped over is what a beekeeper loves to see.


I have one hive that has a queen that is laying so many eggs that she has run out of room in the brood chamber. Sure enough when I inspected the honey super, there she was sitting on six frames of eggs where honey was to be. I took her and placed her in a lower box, then added a queen excluder. In about a month those eggs will hatch out into worker bees and the bees can store honey in the empty comb.

It is nice to see the bees storing honey in comb that I will take as my own in a couple of months. Honey comb is beautiful. The bees collect nectar from the plants and store it in their honey stomachs. Once back in the hive they place the nectar in the comb.

Nectar from flowers contains about 1% sugar. The bees evaporate the water and concentrate the sugar to turn it into honey. Once the honey is “ripe” they cap over the cell with wonderful white wax. The wax seals the honey and keeps it from absorbing moisture from the air.

It is estimated that it takes about 10,000 miles of flying to make a table spoon of honey.

It is exciting to see.

Above:  Ripe honey being capped by the workers.  You can see the white capping wax.


In a couple of months we will taste that honey.

What honey tastes the best to me?

The honey that’s in my mouth at that particular moment of course!

June 9, 2010

Strange Ideas

May and June have been good to the bees here on Cape Cod. For the first time in many years we actually had “spring”.


Right:  Two of the packages of bees we installed in May


Typically here the temperatures stay cold (because we are surrounded by water on three sides), until the end of may. Then suddenly it is HOT….. Until September.

This lengthened spring with nice weather has allowed the bees to take full advantage of the honey flow. I guess it is the least mother nature could do for us after last spring.


Left:  Empty packages on top of the newly created colonies.  In three weeks the bees have drawn all the comb in the first boxes.  The second deep brood chambers were added to these hives last week


Both Kona queens were accepted by their colonies, and have been diligently laying a thousand eggs each day for the past two weeks. Their patterns are beautiful. They are laying a solid worker cell pattern. I am pleased. The queens are only limited by the ability of the workers to produce new comb, and the amount of honey an pollen being stored.

I also managed to obtain a Minnesota Hygienic Queen two weeks ago. I recently discovered that this particular strain of honey bee has their roots in the old “starline” strain of bees. The Starline breed was sold by Dadant and Sons many years ago. They were the first bees I kept in my early years of beekeeping. My uncle and grandfather, who got me started in beekeeping, swore by them.

I remember that I did not know much at that time about beekeeping, and made many mistakes. Those starline bees lasted for years without any help from me. Year after year they would product honey, capped with the whitest wax I have ever seen. Alas they are no longer produced.

We will see how their great great great cousins do!


Right:  Honey supers (top thin boxes) have been added to the strong colonies.  The hive on the far left was the hive that had the two queens last month.  Mother and daughter existed side by side for over a month.

The Kona queens are installed in the two far right colonies


The one queen I kept from my queen rearing project last summer is doing outstanding. Honey supers have been added and the bees are busy filling the empty comb with honey.

Honey supers were added to the colonies last week. Within 24 hours the bees were working the comb, storing nectar, which will be turned into honey over the next two months.

I have the habit of obsessing about ideas that pop into my head. An idea will come to me, and I will spend much of my free time thinking about it, sketching it, drawing it, planning it.

This past winter I had two such apparitions, or perhaps I should call them obsessions.

I am about 80% complete with the fabrication of the second. I share here.


Left:  My latest bee endeavor....  Any guesses?

Click on the photo to enlarge.


Can you guess what it is?

Yes… It does have to do with beekeeping.

May 7, 2010

Hawaiian Queens

Update:  We are now on Facebook at:

http://www.facebook.com/group.php?gid=112000928841858&v=app_2373072738#!/group.php?gid=112000928841858&v=wall

Come Visit!


Last night I was informed that a fellow beekeeper had just received a shipment of queens from Hawaii.

With a quick call, and short driver over to the next town, I had two beautiful Kona Queens.


Above:  Two Kona Queens From Hawaii.  The blue mark indicates they are 2010 queens


Since they did not have any attendant workers in the cages with them I needed to get them into colonies as soon as possible. From what I have heard from fellow beekeepers the Kona queens have done well here on Cape Cod.

Last week’s inspections revealed that one of the hives was queen-less, while another had dwindled down to about one hundred bees.


Right:  a few of our colonies.  You can see the two white 5 frame nucs, just created, in the center bottom of the photo.  One of these nucs contains the old queen discovered during the hive inspection.  The other contains bees, eggs, and larva.  They will have to raise their own queen.


As you may remember the queen-less hive is our "nasty" hive, and being queen-less did not help their attitude much. As I opened the colony I had flashbacks of the previous week’s events, and wondered if that nasty little worker bee was still waiting for me inside.

As I looked over the frames I could see that they were attempting to build queen cells, but had nothing to put in them since the hive had no queen, larva, brood or eggs. I found three empty queen cell starts.


Left:  The hives are still working the dandilions.


As soon as I placed the queen and her cage on top of the frames the worker bees were all over her. I plan on letting them get to know her for a few days before I remove the cork protecting the candy in the cage. Once I remove the cork the workers will eat through the candy in a day or two and release her. I want to revisit this hive to verify that there is no laying worker before I take the chance and allow them to release her. This will provide a few additional days to help in acceptance.

Perhaps, with a new queen, this hive will settle down a bit. If the workers accept the queen she will begin to lay eggs, and the entire genetics of the colony will change over the course of two months making this hive more gentile.

I opened up the dwindling hive to look at them. Sure enough they had killed the failing queen, and in her place built five queen cells!


Right:  Workers gather water for the colonies.


I destroyed the queen cells and place one of the new queens on the top bars in the colony. I will check again in about 5 days to make sure the workers have released her.

While I was out in the apiary I thought I should look in on the hive that superseded the queen from 2007. I opened the hive to find it full of eggs and young larva! The new queen is doing fine.

Guess what else I found! Sure enough, there in the top box, was the old queen, with her faded yellow marking and all!. I put her aside in a nuc box with an additional frame of bees and brood, and continued to look for the new queen. I found her in the bottom box with eggs and young larva! She has filled out since mating and is a good size.

This is the first time I have seen this. Mother and daughter queens existing in the same hive.

They have been coexisting for at least two weeks if not longer.

What a surprise!

I never know what I am going to find next!

March 8, 2010

If I knew then what I know now

This blog post will be an examination of my queen rearing attempts over the past three years with conclusions regarding correct and or incorrect processes.

My queen rearing project began out of a desire to see my bees survive the damp cape cod winters. I had been experiencing a 50% to 80% loss of colonies from year to year.

Left:  Example of bee larva of various ages.


I along with many beekeepers have noticed that over the past 30 years it has been harder and harder to keep bees. I have seen winter hive looses, not to mention summer hive losses, increase year after year.

I remember when I was 17 years old with my first hive of bees. They were Starline hybrid bees, and I knew next to nothing about keeping them. The hive survived for years on its own. Now that would seldom if ever happen. A hive that is not carefully kept and attended to will probably die the first season. Trachea, and Verroa mites along with the small hive beetle, as well new bee viruses, not to mention colony collapse disorder have devastated the bee population.

Right:  Queen Pupa of the development age from different size queen cells.  These queens were grafted on the same day.  Their developmental variation is probably due to the age of the larva at the time they were grafted.


In breeding and mass production of queens have weakened the genetic quality of our bees. Queens that would once last four or five years need to be replaced every two.


 Left:  A steady hand is needed to transfer the fragile larva from the comb into the artifical cell


 So what have I done about it? Well three years ago I started learning how to raise queens of my own. With both success and failure.

2007 (year 1). I experimented with two methods of queen rearing. The miller method, and the Doolittle method. I quickly became apparent to me that the Doolittle method allowed me much more control over the queen rearing process.

Right:  Larva after being grafted.  These larva should be only three days old.  Their various ages can bee seen by the degree of curviture of the larva.  Three day old larve look like a comma.  Some of these grafts appear to be 4 or 5 days old.  This would result in poor quality queens.


Positive

I learned how to graft (I was dry grafting at the time) larva into artificial cells.

I learned how to create a cell starter colony

I learned how to create a cell builder colony

I learned how to create queen mating nucs.

I was able to have 10% of my grafts accepted by the cell builder colony (9 out of 90 grafts)

Good size queen cells were created by the cell builder colony

I had 8 queens emerge

Queens were of adequate size.

I had 3 queens mate and start laying

 
Left:  Two days after grafting and being placed in a cell builder, you can see the larva floating in a pool of royal jelly.  You can also see how the nurse bees have started to add wax to the plastic cell as they start creating the queen cell.


Negative

Only 10% of my grafts were accepted

No queens survived into 2008


2008 (year2). I continued to experiment with the Doolittle method of queen rearing. I started to learn more about bee genetics and the importance of the Drone (male). I took a queen rearing class and discovered that if the artificial cells were primed with royal jelly, or even plain yogurt, better grafting results could be obtained.

Left:  My first queen cells from 2007.  You can see how large they are.  This is due to the proper age larve being grafted into the cell, and the fact that only 8 cells were accepted and fed by the nurse bees.  The cell builder colony was not over whelmed by the number of queen cells.


Positive

I raised queens three times that spring.

Wet grafting of larvae improved my acceptance rate to 90%

Grafting 90 cells yielded 80 queen cells.

I raised 15 mated queens that season.


Negative

Queen cell size was very small. This was partly due to my over whelming my cell builder hives with too many queen cells. I believe that I also grafted larva that was 4 or 5 days old not 3 as I should have. This resulted in smaller cells and smaller queens.

I had a problem creating nucs. I was not as organized as I should have been. I attempted to make splits from nearby colonies. 50% of the nucs created returned home to the mother hives abandoning the queen cells and brood placed in the nuc. The previous year I had used relocated bees to create the nucs. That method worked much better.

Right:  Queen cells from 2008.  You can see how small the cells are.  This was probably due to the number of grafts placed in the cell builder and the age of the grafted larva being too old.


I had problems with small hive beetle larva infesting two of the nucs creating a situation where the bees abandoned the nuc. This was probably due to the low numbers of bees remaining in the nucs thus creating stress within the nuc colony.

Queen quality was poor due to the small cell size. I did not attempt to over winter any of the queens.


2009 (year 3). I continued with the Doolittle method of queen rearing. It was an extremely cold wet spring. The colonies would not buildup and missed the main honey flow (May, June, and July). All the colonies were starving in August, a time where there should have been 60 pounds of surplus honey on each hive. Since there was no promise of honey that season two of the colonies were used for queen rearing.


Left:  Grafts from 2009.  Better cell size, but still too small.


Positive

I continued having great success with grafting and acceptance of the grafts. This improved to a 95% acceptance rate.

I learned how to create and use, with success, a queen right cell builder colony.

Grafted three cycles of queen cells over a two month period.

Raised 25 queens.

Learned how to bank queens.

One queen was overwintered and has survived.

 
Right:  More small queen cells


Negative:

Queen cells were small again. It became apparent that I was grafting larva that was too old. During one cycle, queens emerged two days before the expected age of 16 days old destroying 19 queen cells.

I had the same problems with creating mating nucs. Many queens were lost because the workers returned to the mother colonies.

I became allergic to bee stings


2010 (year 4). We will see, won’t we!


Spring

Spring
Peach Pollen

Spring Pollen

Spring Pollen

Queen Cell

Queen Cell
Well Fed Queen Cell

Marked Queen

Marked Queen
Queen produced from my second graft attempt